diagram.json File Format
Each simulation project contains a diagram.json file. This file defines the components that will be used for the simulation, their properties, and the connections between the components.
File structure
The diagram file is a JSON file with several sections. The basic file structure is as follows:
{
  "version": 1,
  "author": "Uri Shaked",
  "editor": "wokwi",
  "parts": [],
  "connections": []
}
"version" is always 1, "author" is the name of the person who created the
file, and "editor" is the name of the application that was used to edit the
file ("wokwi").
In addition, you can add a "serialMonitor" section to configure the Serial Monitor.
Parts
The "parts" section defines the list of components in the simulation.
It's an array of objects with the following properties:
| Name | Type | Description |
|---|---|---|
| id | string | the unique identifier of the part (e.g. "led1") |
| type | string | the type of the part (e.g. "wokwi-led") |
| left | number | x screen coordinate (in pixels) |
| top | number | y screen coordinate (in pixels) |
| attrs | object | part attributes (e.g. "color" for wokwi-led) |
| rotate | number | rotation in degress (e.g. 90) |
| hide | boolean | if true, the part won't be visible |
id and type are required, the other fields are optional.
For example, here's how you define a red LED called "led1" at position (x=100, y=50):
{
  "id": "led1",
  "type": "wokwi-led",
  "left": 100,
  "top": 50,
  "attrs": {
    "color": "red"
  }
}
Each part must have a unique "id" property. If two parts have the same "id", the simulation may not function correctly.
Use wokwi-cli lint to validate your diagram.json file and catch common issues like unknown part types, invalid pin connections, and duplicate IDs. See the CLI Usage guide for more details.
A partial list of part types (e.g. wokwi-led) can be found under the "Diagram Reference" section of this guide. We're currently working to expand this list. Meanwhile, some of the parts are also documented at Wokwi Elements.
If your simulation project contains code, the diagram should include a microcontroller part that will execute your code. The following microcontrollers are currently supported:
wokwi-attiny85- ATtiny85wokwi-arduino-nano- Arduino Nanowokwi-arduino-mega- Arduino Mega 2560wokwi-arduino-uno- Arduino Uno R3wokwi-pi-pico- Raspberry Pi Picoboard-esp32-devkit-c-v4- ESP32 (official devkit)wokwi-esp32-devkit-v1- ESP32 (unofficial devkit)board-esp32-c3-devkitm-1- ESP32-C3board-esp32-c3-rust-1- ESP32-C3board-esp32-c5-devkitc-1- ESP32-C5board-esp32-c6-devkitc-1- ESP32-C6board-esp32-c61-devkitc-1- ESP32-C61board-esp32-h2-devkitm-1- ESP32-H2board-esp32-s2-devkitm-1- ESP32-S2board-franzininho-wifi- ESP32-S2board-esp32-s3-devkitc-1- ESP32-S3board-esp32-s31-function-coreboard-1- ESP32-S31board-esp32-p4-preview- ESP32-P4board-st-nucleo-c031c6- STM32 Nucleo-64 with STM32C031C6 MCUboard-st-nucleo-l031k6- STM32 Nucleo-32 with STM32L031K6 MCUboard-xiao-esp32-c3- ESP32-C3board-xiao-esp32-c6- ESP32-C6board-xiao-esp32-s3- ESP32-S3
Instead of manually specifying the left/top coordinates for each item, you can drag them with the mouse to the desired position.
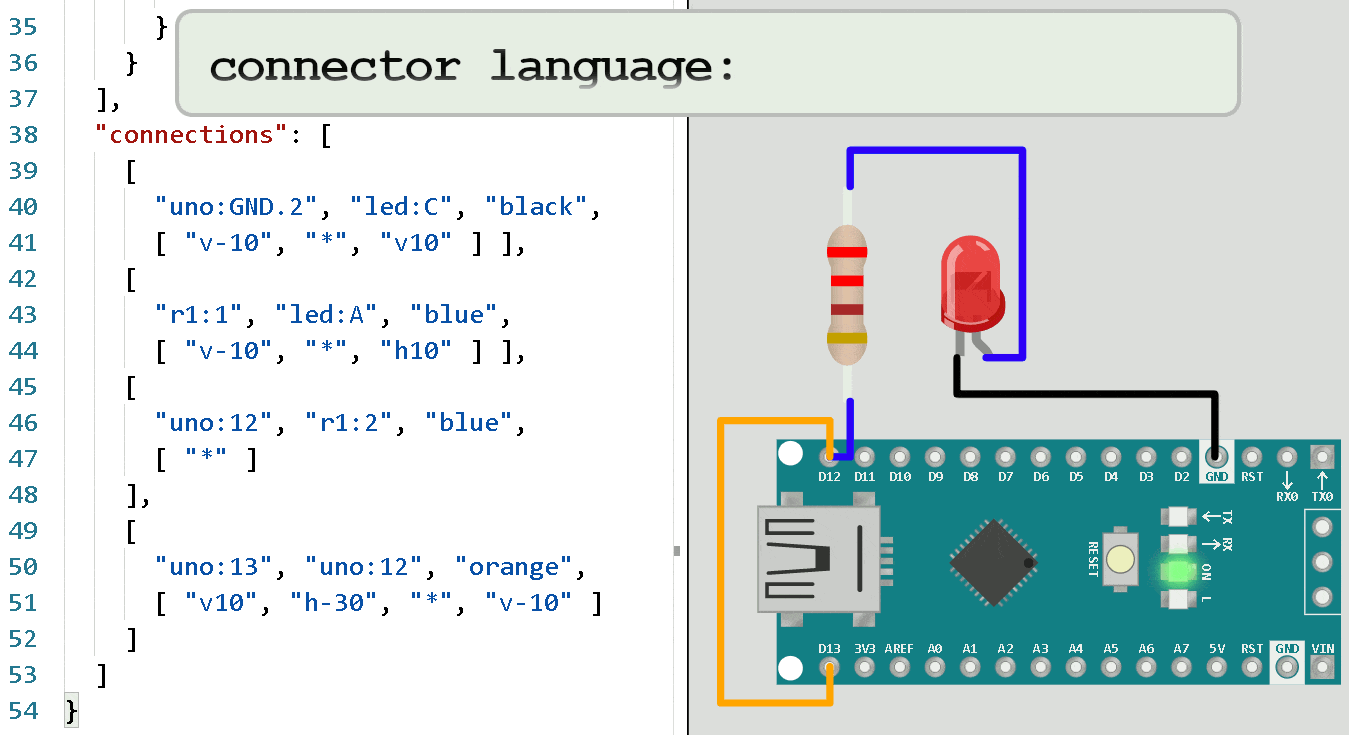
Connections
The "connections" section defines how the parts are connected. Each connection is an array with four
items:
- The source component id and pin name, separated by a colon. e.g.
partId:pinName - The target component id and pin name
- The color of the wire (or an empty string to hide the wire)
- A list of instructions how to place the wire, as an array of strings (optional)
For example, the following definition will connect the A (anode) pin of led1
to pin 13 of the uno part:
["led1:A", "uno:13", "green", []],
You can find the name of a component pin by moving the mouse over it.
Wire placement mini-language
Each item in the "connections" section can specify a list of instructions
how to draw the lines for the wire. Wires always go in straight lines, either
horizontally or vertically, and never diagonally.
There are three instructions:
- "v" followed by a number of pixels: move vertically (up/down)
- "h" followed by a number of pixels: move horizontally (left/right)
- "*" can appear only once. All the instructions that appear before the "*" apply to the source pin, and the instructions that appear after it apply to the target pins.
For example:
["v10", "h5", "*", "v-15", "h10"]
The "v10" will move 10 pixels down from the source pin, then "h5" will move five pixels the right.
The instructions that appear after the "*" are applied in reverse order: "h10" will move 10 pixels right of the target pin, then "v-15" will move 15 pixels up.
Finally, the simulator will connect the two ends of the wire with a combination of horizontal and a vertical wire that cover the remaining distance, as necessary.
Wire placement animation
If you are a visual learner, you may find the following GIF animation useful. The animation was created by Steve Sigma.